 mapboxgl源码解析-1-打包逻辑分析
# mapbox-gl
是一个基于 WebGL 的开源地图引擎,既然是开源的 那么我们就开始一起来学习源码吧(当前解析的源码版本是 "version": "2.12.0-dev")
# 前言
我在百度上搜了一下网上关于mapbox源码的解读,发现目前所有搜到的文章要么是从单个的功能上进行解读的,比如瓦片是如何渲染出来的,用了什么机制,自定义一个样式,要么是画了一个大体的框架流程,让读者看等等,但这些其实太过抽象对于我们要完全看懂源码是不够的,我们需要能以作者的视角来思考,能像自己平时调试自己的项目一样调试mapboxgl的代码,而不是只从最终实现了其中一个功能点来解读,所以今天先从打包逻辑开始:
# 下载mapbox-gl源码
# 正常运行调试命令
- 为了能更好的调试我们需要适当的修改一下打包逻辑
观察package.json:
 "watch-dev": "rollup -c --environment BUILD:dev --watch",
 "start-server": "st --no-cache -H 0.0.0.0 --port 9966 --index index.html .",
 "start-debug": "run-p build-token watch-css watch-dev start-server",
// build-token这个会生成access_token,mapbox请求style和数据服务的开发环境下的token
// start-server 开启端口是9966的服务 并监听所有debug下的文件
2
3
4
5
运行
npm install
npm run start-debug //可以随意打开debug文件夹里的html文件进行调试了
2
# 现在我们来看打包逻辑
观察打包逻辑rollup.config.js:
// 由于篇幅关系只看关键代码
   ...
   [{
    input: ['src/index.js', 'src/source/worker.js'],
      output: {
        dir: 'rollup/build/mapboxgl',
        format: 'amd',
        sourcemap: 'inline',
        indent: false,
        chunkFileNames: 'shared.js'
    },
   ...
},{
    input: 'rollup/mapboxgl.js',
    output: {
        ...
         name: 'mapboxgl',
        intro: fs.readFileSync(fileURLToPath(new URL('./rollup/bundle_prelude.js', import.meta.url)), 'utf8'),
        banner
    },
2
3
4
5
6
7
8
9
10
11
12
13
14
15
16
17
18
19
20
可以看出项目有两个入口文件打包成两个独立的包! 其实这是因为我们的mapbox项目的所有资源的渲染和数据的加载都离不开子线程worker,但worker的一个特性是传入的代码必须遵守 同源策略 ! 所以mapbox用了这种非常秒的方式来解决此问题,将其中关于worker的包直接引入到了第二个打包名为mapboxgl包文件里,这样就能保持同源,现在我们看bundle_prelude.js代码:
// 由于篇幅关系只看关键代码
   var shared, worker, mapboxgl;  //这个是接收第一个打包配置生成的3个amd格式的包,通过rollup本身的运行机制将3个包赋值
function define(_, chunk) {
if (!shared) {
    shared = chunk;//这里是通过rollup打包后的资源加载的机制将每个包赋值到已命名的三个参数上,所以可以看出 我们的打包配置的顺序非常重要 不能改变打包顺序
} else if (!worker) {//同上解释,进行了三次循环赋值
    worker = chunk;
} else {
  //最终将前两个关于worker的代码拼接成了workerBundleString字符串,然后通过 window.URL.createObjectURL(new Blob([workerBundleString], { type: 'text/javascript' }))将这整个字符串处理成了workerUrl的同源的链接!
    var workerBundleString = "self.onerror = function() { console.error('An error occurred while parsing the WebWorker bundle. This is most likely due to improper transpilation by Babel; please see https://docs.mapbox.com/mapbox-gl-js/guides/install/#transpiling'); }; var sharedChunk = {}; (" + shared + ")(sharedChunk); (" + worker + ")(sharedChunk); self.onerror = null;"
    var sharedChunk = {};
    shared(sharedChunk);
    mapboxgl = chunk(sharedChunk);
    if (typeof window !== 'undefined' && window && window.URL && window.URL.createObjectURL) {
        mapboxgl.workerUrl = window.URL.createObjectURL(new Blob([workerBundleString], { type: 'text/javascript' }));
    }
}
}
2
3
4
5
6
7
8
9
10
11
12
13
14
15
16
17
18
19
再看我们第一个输出配置生成的文件在rollup/mapboxgl.js:
//注意看:此时生成的文件路径循序正好对应了上面的define请求时赋值的顺序,所以不能改变顺序
import './build/mapboxgl/shared';
import './build/mapboxgl/worker';
import './build/mapboxgl/index';
export default mapboxgl;
2
3
4
5
6
然后在web_worker.js里创建workers:
(mapboxgl.workerClass != null) ? new mapboxgl.workerClass() : (new window.Worker(mapboxgl.workerUrl): any);
这打包策略完美的解决了worker创建问题!是不是很妙!!
可以从上面看出 其实我们的mapbox项目应该分成两个部分 一个是主程序'./build/mapboxgl/index';代码 和 子程序'./build/mapboxgl/worker' 代码 (ps:/build/mapboxgl/shared 这个是公用的部分工具代码)
那现在我们在worker和index里分别写一个console.log('我是worker部门')、console.log('我是主程序部门')来运行一下:
npm run start-debug
我们会发现:
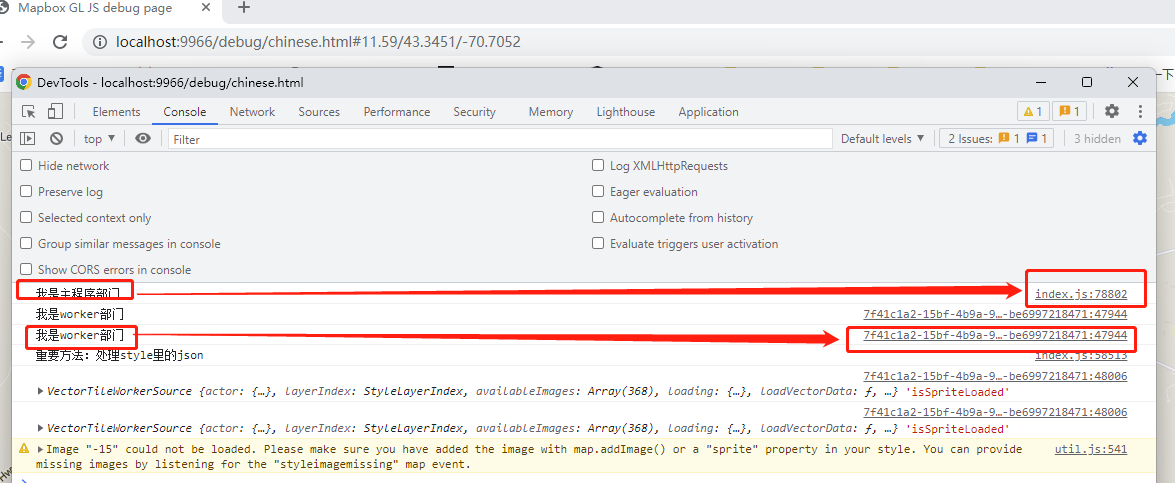
主线程打印的内容后面能通过sourcemap定位到源码的位置,但子线程打印的内容却定位到了一串随机生成的文件上,无法定位源码的位置,对于我们调试代码造成了困难!!!
那我们该怎么改造呢?
继续看代码我们发现了rollup.config.csp.js打包文件:
const config = (input, file, format) => ({
    input,
    output: {
        name: 'mapboxgl',
        file,
        format,
        sourcemap: true,
        indent: false,
        banner
    },
    treeshake: true,
    plugins: plugins({minified: true, production: true, keepClassNames: true})
});

export default [
    config('src/index.js', 'dist/mapbox-gl-csp.js', 'umd'),
    config('src/source/worker.js', 'dist/mapbox-gl-csp-worker.js', 'iife')
];

//可以看出这个打包配置是将主程序打包成dist/mapbox-gl-csp.js
//子程序worker代码打包成 dist/mapbox-gl-csp-worker.js分开了
2
3
4
5
6
7
8
9
10
11
12
13
14
15
16
17
18
19
20
21
22
那我们可以通过传统的方式引入worker,先在debug文件夹里创建一个worker.html,然后写入以下代码,这样就能很方便的调试到worker里的源码位置了:
//只展示关键代码
...
<head>
    <link rel='stylesheet' href='../dist/mapbox-gl.css' />
</head>
<body>
    <div id='map'></div>
    <script src='/dist/mapbox-gl-csp.js'></script>
    <script nonce="app-js">   //一定要加入nonce="app-js"  这个为了告诉浏览器的内容是安全的

        mapboxgl.workerUrl = '/dist/mapbox-gl-csp-worker.js'; //这里就是我们的worker代码

        new mapboxgl.Map({
            container: 'map',
            // zoom: 12.5,
            // center: [-77.01866, 38.888],
            style: 'mapbox://styles/mapbox/dark-v10',
            projection: { name: "globe" },
            // hash: true
        });
          </script>
2
3
4
5
6
7
8
9
10
11
12
13
14
15
16
17
18
19
20
21
22
然后我们再在package.json里加入我们自己的运行命令:
  "scripts": {
    "watch-worker": "rollup -c rollup.config.csp.js --watch",
    "start-server": "st --no-cache -H 0.0.0.0 --port 9966 --index index.html .",
    "dev-worker": "run-p watch-worker start-server" //我们自己的命令
  }
2
3
4
5
6
然后运行:
npm run dev-worker
最终我们看worker.html运行的控制台发现都能定位到源码位置:
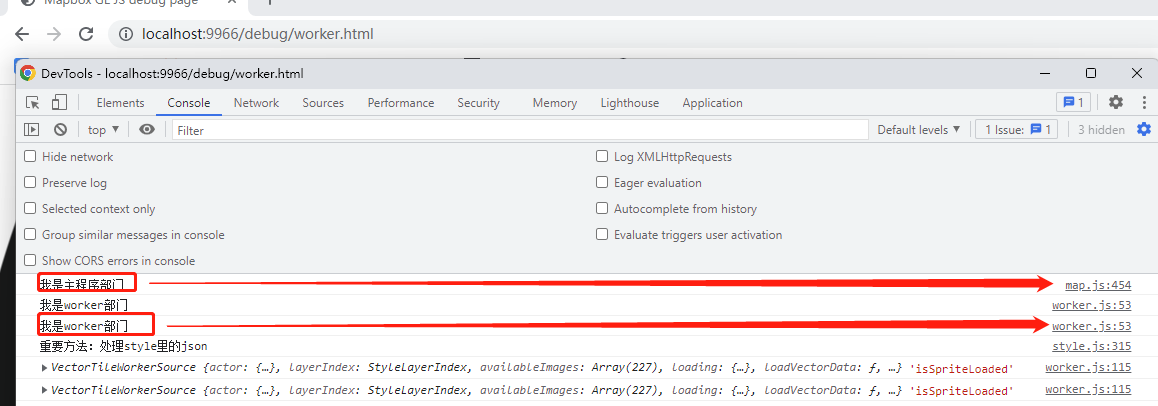
这样我们就能像写自己的项目一样调试代码了!
今天先到这!下一篇讲:我们的worker和主线程如何实现双向绑定的,并能互不干扰的加载和渲染资源